Evo X…treamly confusing?

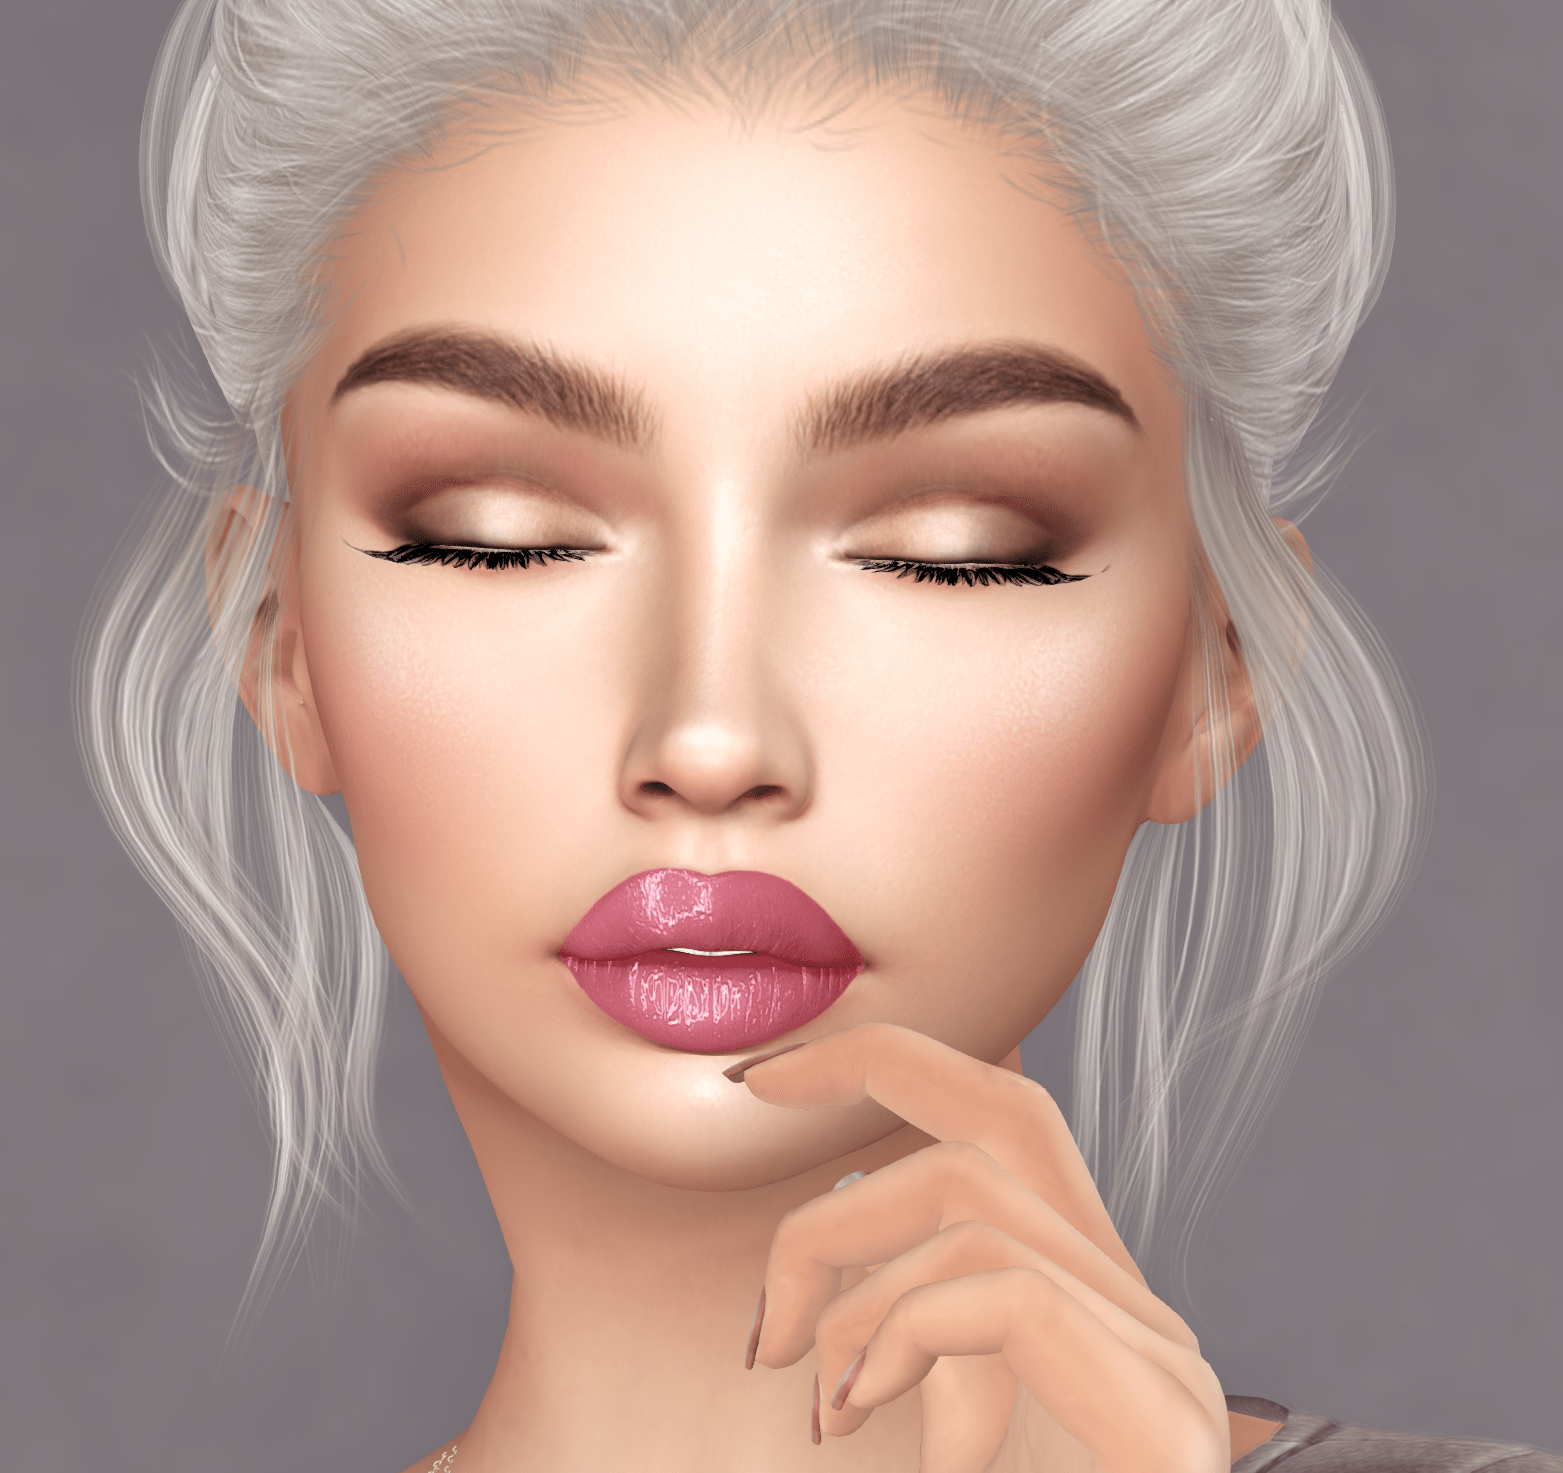
Today I am going to break down the changes to the Lelutka heads in the Evo X line (Avalon, Briannon and Ceylon) that recently came out at Skin Fair so that you will hopefully be better able to use the new heads with a bit more confidence.

FIRST! It will be very helpful if you understand how BOM and HD appliers work, so if you haven’t already, please read my blog posts on those (unless you’re a mesh head wizard, in which case proceed to the fun stuff!)

  • Back that BOM Up: Part 1 in my series explaining Bakes on Mesh. This details some of the basic things you may need to understand how BOM works.
  • Keep Calm and Bakes On (Mesh): Part 2 in my series explaining Bakes on Mesh, this tells you how to use BOM and how it works.
  • WTF IS HD???: I explain what “HD” or “High Definition” appliers are and why they are different from standard appliers.

What the heck is Evo X?

To use Lelutka’s words: “The Evolution Xtreme (Evo X ) is the latest addition to our Evolution line. It is an extension of the original Evo heads.” One of the features of the new head is the ability to use extreme mode. Sounds cool huh? But what the heck is it?

If you look at the Evo X HUD, at the top of the head menu you will see “Classic” and “Evo X” (the X stands for Extreme). (UPDATE: as of v 3.1 these modes are called “Evo” and “Evo X”) You can tab between these two options. You will also notice that in one your avatar will look normal, and in another you will look downright wack!

Do not panic!

This is, as we say, a feature and not a bug. Bear with me. Take deep, cleansing breaths. It will be ok.

If you read my previous posts linked above you’re somewhat familiar with something called a UV. To review, it’s basically a template that lays out how a flat texture will apply to a 3D surface. Think of the UV as a clothing pattern. If you cut the fabric incorrectly it won’t fit on whatever you’re making.

Now, up until Evo X all the Lelutka heads used the standard UV by default. This is the UV that Second Life was originally made to use. This is why you can wear a BOM layer across multiple heads. They may need slight adjustments to fit different heads, but you won’t look like a freak of nature because the mouth, nose, eyes, etc. are generally in the same place. They’re all using the same “pattern”, which is, the standard UV.

https://www.robinwood.com/Catalog/Technical/SL-Tuts/SLDownloads/UVMaps/SL-Avatar-Head-1024.jpg
The standard UV, updated for ease of use by Robin Wood

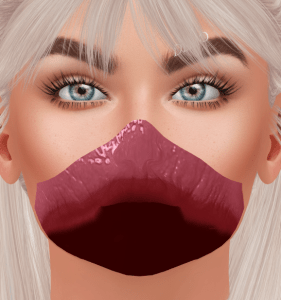
You’ve been happily using Lelutka heads as usual, with your standard skin, maybe some BOM layers and HD, and everything was right with the world. Then you put on an Evo X head and this happened…

AHHHHHHHHHHH!!!!!!

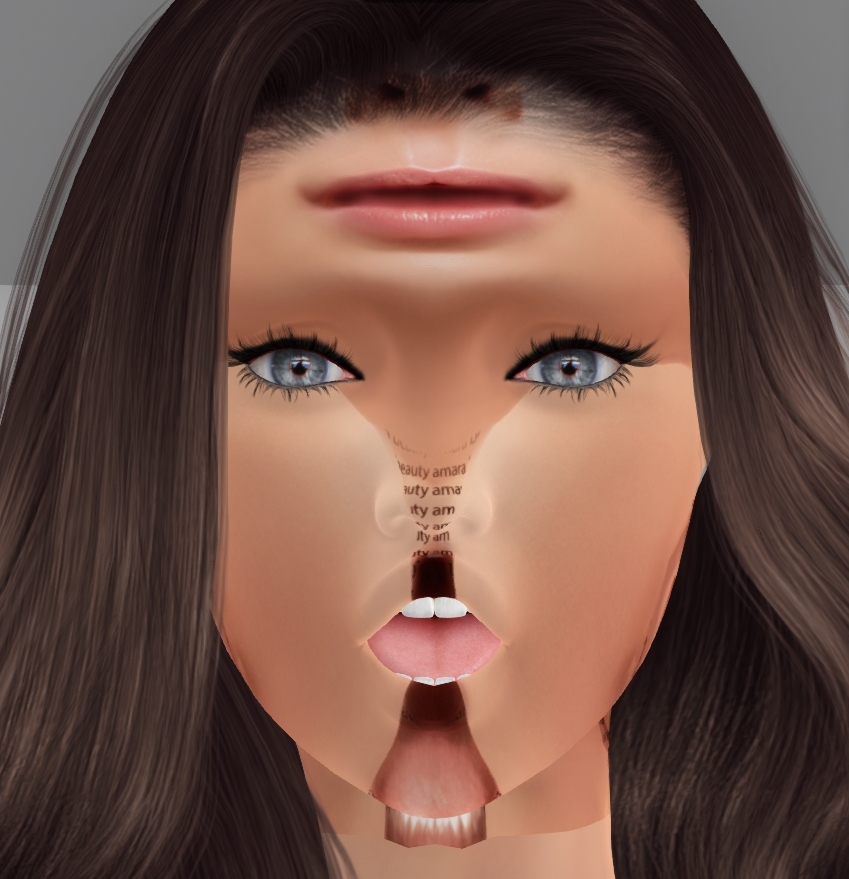
Remember what we just learned about the standard UV? Well, Evo X comes with extreme mode on by default. This mode uses a custom UV, meaning, a UV that differs from the SL standard UV. That’s why you have a mouth on your forehead. It’s actually supposed to look that way if you’re wearing a skin using the standard UV, because you’ve basically got the wrong pattern on, that’s all. See? Not the end of the digital world! Ooohhmmmm…

Now, if you use the face, ear and brow layers included with the head, while in Evo X mode, you will notice everything goes back to looking normal and way less terrifying! Yay! That’s because the skin, brows and ears included with the Evo X heads are made using the correct UV for Evo X mode.

In Evo X mode the head uses the Evo X UV, so you will need to use BOM layers that are also using the Evo X UV. Otherwise you’ve got the wrong pattern on, sort of like cutting out fabric for a dress and trying to fit it on your couch. It just wont look right, even if it makes your couch feel pretty.

What Does Your Furniture Say About You? | drsofa.com blog
I couldn’t find a picture of a couch wearing a dress but this is decent nightmare fuel

So let’s take a look at the Evo X UV so we can compare it to the standard UV. Notice where it’s different?

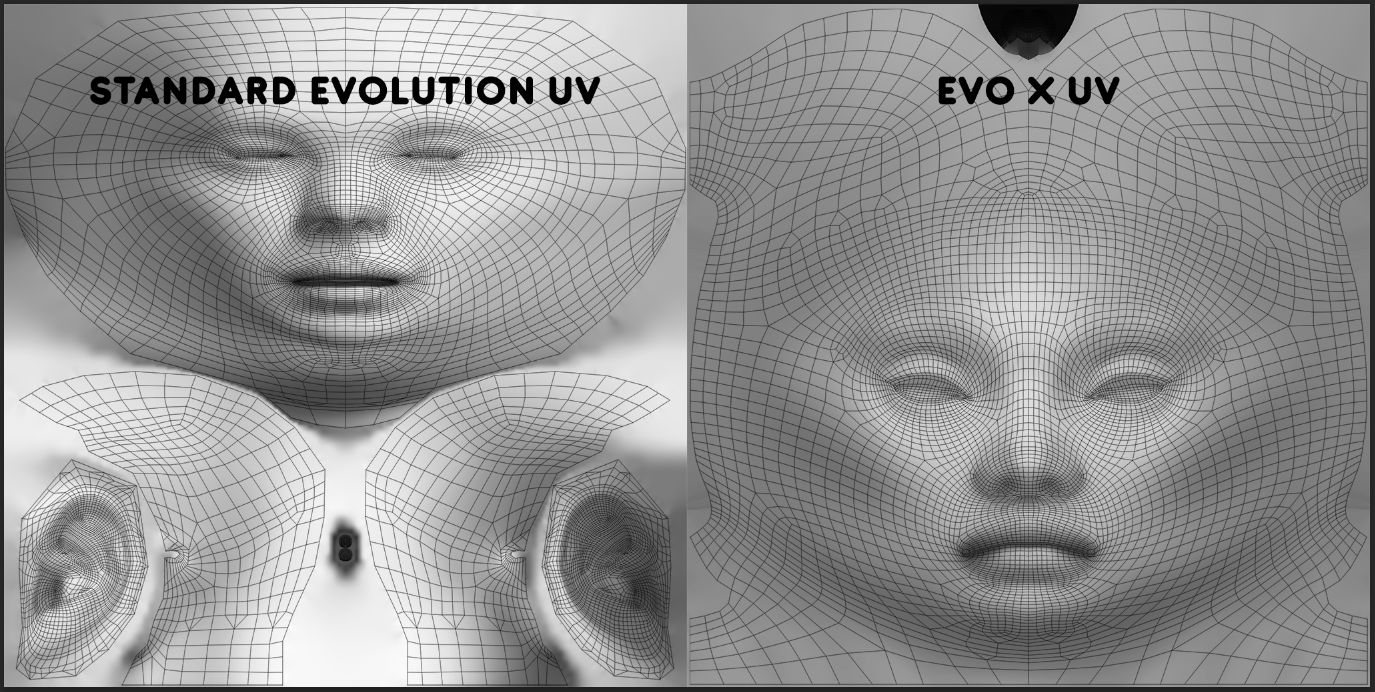
Both UVs use the same resolution, or texture size, because SL has a max texture size of 1024×1024. Everything, even HD, is restricted to this max texture size. As I explain in my WTF IS HD!? post, the higher detail comes from giving an area (like the eyeshadow layer) more space on the texture so that it has more pixels to work with.

With the standard based UV on the left the ears and side of the head take up almost half of the texture’s space, while the face takes up a fairly small amount. This is why standard BOM makeup is not as detailed as HD makeup, because there just isn’t much space on the texture for lipstick and eye shadow. Less space means less pixels means less detail.

With the Evo X UV on the right the face area is larger. By making a custom UV in which the face area is bigger the Evo X head allows for greater facial details while still using the same texture size and utilizing the benefits of BOM. Think of it as a halfway point between standard BOM and HD appliers. HD appliers still have the most detail, but Evo X BOM has more detail than standard BOM.

The ears on the Evo X UV also get their own texture, so they also allow for more ear details like tattoos! Nifty! Expect to see a lot more Elves running around SL.

Next you’re probably thinking “So wait… I can’t use standard skins and makeup on my Evo X head that I just bought!?!?!!

Actually, you can. Remember those two modes I pointed out in the HUD, earlier in this post? If you switch to “Classic” mode the head goes back to using the standard UV, just like previous Lelutka heads. You can switch between the two all you want, you just cannot mix which type of UV you are wearing. If you’re in Classic Mode you must wear classic UV based BOM layers. If you’re in Exo X Mode you must use Evo X BOM layers. HD appliers work the same in both modes, so you can use those on your head no matter what mode you’re in.

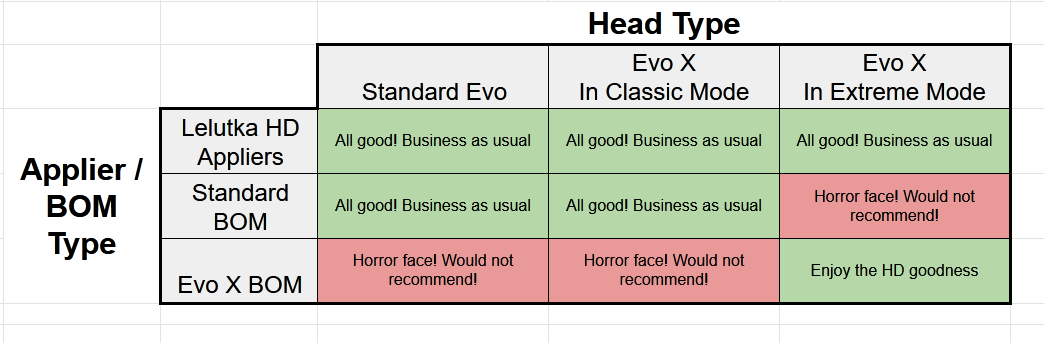
Here is a little cheat sheet I made to quickly reference what items work on which head and in which mode:

So how do you know you’re buying a product that works for Evo X? Read ads and… I have a secret…

DEMO DEMO DEMO

ALWAYS DEMO!

Don’t buy something until you’re sure it works the way you thought it would! The means trying a demo, whenever available, and reading the ads and any help/info note cards. Unless you like gambling with your $L in which case please go to my store and buy everything! (Ok seriously please don’t do that, I get enough people buying the wrong thing I do not need anyone else doing it pleaaaaaaaaase just demo stuff so I can make you happy!)

UPDATE: Although Lelutka updated all Evolution heads to include EvoX features, each head includes only the original skin it was released with. Heads which were originally released as Evo, before EvoX came out, include only their original Evo skins. They do not include EvoX skins. You can use EvoX skins by switching your mode, but you will need to get an EvoX skin to use it with. For heads originally released as EvoX, they include only EvoX skins.

Now, go forth and Evo X! If you have more questions about the new heads here are some resources for you:

Many of the most common questions about Evo X are answered on the Lelutka FAQ, so check that out. You can also get a walkthrough of the HUD and other features by downloading the manual here.

Need help? Join Lelutka’s Discord and post in the #help-lobby.

Back that BOM Up

If you were reading my previous blog post, Keep Calm and Bakes on Mesh, and found some of the terminology confusing, then my hope is to help give a better foundation for understanding what the heck I was talking about!

If you’re someone who came into SL after mesh was established, or you’ve been away for a while, or you just plain don’t remember how stuff used to work (It’s ok, I don’t like to think back on those dark days either) the switch to Bakes on Mesh can be reaaaaally confusing.

Even if you don’t plan to switch to BOM, the information I provide below can be really handy for helping your understand how mesh heads and bodies work so that you can be a few steps closer to a power user!

A little disclaimer

I am going to use the word “texture” a lot, and technically speaking I am referring to what we creators call the diffuse texture. For our purpose all you need to understand is that the texture I am talking about is the basic look of the item you’re changing on your mesh. It’s your skin, your tattoo, your makeup, lashes, it’s use on hair and furniture and everything to give it color, shading, and just to make it look real. I am not going to get into materials textures in this post, called normal and specular textures, which control the way your mesh interacts with light, so you don’t have to worry about that right now, just be aware they exist in case that comes up for you later.

Now, the first thing to understand about Bakes on Mesh is that you can change the textures on your mesh two ways. With an applier, or with a system layer. Each functions differently and has advantages and disadvantages. This is also one of the areas that tends to confuse people, so let’s talk about it.

What the heck is the difference between an “applier” and a “system layer”???

As I’ve said, when you have a mesh head/body with BOM capability there are two ways to change the textures on it. The first is the way we’re the most familiar with, because it was how we did it until BOM came along, which is to use an applier. An applier is a scripted object that attaches to your screen, called a HUD (Heads Up Display). When you press a button on the applier the script transfers a texture to your head/body. With appliers, the texture is transferred to a layer on your mesh, which I will explain shortly.

c4206652ed67aa25502fee899c813005

Above is an example of one of my blush appliers. When you wear it, the HUD attaches to the lower right corner of your screen. You click one of the pictures to apply that blush to the blush layer on your head.

Most mesh heads and bodies have various layers packed tightly together, all sitting just above your skin layer which serves as the base. This is called onion skinning. Makeup, brows, freckles, tattoos, etc. are all applied to one of the upper layers which makes them visually sit on top of your skin like they would in real life. The applier tells the mesh what texture to apply, and which layer to apply it to. Some appliers, like the newest version of Omega, have a rerouting function that lets you choose which layer to send it to. This can be handy in some cases, but for the most part the applier knows what to do and you don’t have to worry about it. Yay!

When you want to remove something you’ve applied to one of these layers you can either replace it with another applier, which replaces the texture on that layer with another, or clear/disable the layer via the HUD for your body/head. Each layer can (usually) only hold one applier, so there is a limit to how many things you can have on top of your skin, depending on the head/body you are using.  Appliers like skin can only be replaced, because if you cleared the skin layer you would be see through! yikes!

Now, for many years this was how things were done with mesh. If you wanted to change your skin or makeup you had to go buy a scripted applier, apply it to a layer, and off you went. However, there are a few problems with doing it this way. For one, as I mentioned earlier, you’re limited in how much you can apply to your head, because there are only so many layers to put textures on. Another issue is the dreaded alpha glitch. SL handles textures with transparency (in other words, a texture that has some area that is see-through so that the skin below shows, like makeup and tattoos) in a certain way that is… not always uh… helpful. If you’ve ever stood in front of a window and noticed a weird clear halo around your hair, that’s an alpha glitch. Both your window and the wispy parts of your hair use transparency. The system doesn’t layer them together so you see one texture above the other, instead it cancels one of the textures out wherever the two overlap! Sometimes it creates a flickering effect, or does other weird stuff, too.

78b95fe6054dc96936883a82854fc96f

The dreaded alpha glitch! The system is cancelling out the texture of my window in all the places where my mesh hair over lap it.

Now technically… it’s not really a glitch because it’s functioning the way Linden Labs intended but… let’s not get into that. What you need to know is that this causes issues in things like tattoos and other appliers. Sometimes you get a glitch on an applier layer overlapping with another transparent texture.

5f87b9ffa695835497c60f9a70fb3a0a

This is my eyeliner conflicting with my hair, both have transparency. The system is cancelling my eyeliner wherever my hair texture overlaps with it.

It used to be you just lived with the glitches, or found a way around it, because appliesr were the only way the do things, and appliers had to use transparency to look right. Now along comes Bakes on Mesh, aka BOM. Suddenly all the rules have changed! GAH!

As I explain in my first post about BOM, it allows you to use system layers on your mesh head/body. But what the heck does that even mean?

A system layer is found in your inventory, like an applier, but a system layer is not a scripted HUD. It doesn’t attach to your screen or have buttons. You wear it, or take it off, and that’s all there is to it. In “the old days” before mesh heads and bodies that was how you wore tattoos, clothing, makeup and such. There are a few different kinds of system layers, your skin layer, tattoo layers, clothing layers, etc. These basically all helped determine which item was on the bottom and which was on the top or in between. Your skin was always on the bottom, clothes were always on the top, etc. When you wore the system layer the game would take all your worn layers and bake them together (just a fancy way of saying they were combined into one texture), then put that texture on your avatar’s skin layer (although at the time there were no other layers, so no one thought of it like that, it was just your avatar). There was no onion skinning. The advantage to this is that you can layer a lot more stuff on your avatar because you’re not limited to mesh onion skin layers, and there was no alpha glitching because transparency of the upper layers was removed when everything was baked together.

af2f207027cce84c6809fca813497596

System layers as seen in Firestorm. These are tattoo system layers.

Here is where Bakes on Mesh comes in. It allows you to combine the functionality of both systems. BOM will take all your system layers and bake them, then set that texture on the skin layer (bottom most layer) of your mesh. You no longer have alpha glitching, and you can use a LOT of system layers compared to what you could layer with an applier, so long as you are using system layers with BOM enabled. It’s particularly handy if you like to wear tattoos, which easily glitch when applied, but are no problem in Bakes on Mesh. It’s also great for layering lots of makeups for different looks!

Depending on what mesh you’re using, you can use a combination of Bakes on Mesh with appliers on top, if needed. Any HD (High Definition) appliers are not BOM compatible (they use a different texture layout so they just don’t look right unless applied. I explain HD more in this post) so you have to apply them, but you can layer other items below them with BOM. I like to do this with my HD eyeliners, using a BOM eyeshadow below it to change out the color and look of the makeup.

4eca5adb0629d39c46ba0973a5fd75f5

HD eyeliner with t pink BOM eyeshadow below it

Another thing about BOM that tends to confuse people is alpha layers. Before BOM, you had to wear an alpha layer to hide your system body/head (that body and head you had when you first logged into SL) so that you wouldn’t appear to be wearing two bodies. With BOM, your system body/head with be automatically hidden for you, so you do not need to wear an alpha layer. If you do, it will appear as though your head/body has disappeared, because an alpha layer is a system layer, and ANY system layer you’re wearing gets included in the baking process. Alphas were made to hide your body, and they will hide your mesh, too! Now in some cases you can use alphas with BOM to your advantage, such as if there is one included with a mesh wearable like clothing. These alphas may be designed to perfectly hide your mesh to keep it peaking through your clothes. Otherwise, you don’t really need to worry about alphas anymore if you’ve gone full BOM. Any area of your body that is NOT BOM, like your eyes for example, still needs an alpha.

Lastly, in order to use BOM you MUST have a system skin, NOT an applier skin. When the system bakes your system layers it needs a base to bake everything to, and that base is yours skin. Otherwise, everywhere your skin normally shows would actually be see-through, and that’s probably not the look you want. If you attempt to use a skin applier while in BOM, it will automatically disable BOM and you will see your system head/body again and lose anything you were seeing on your skin layer while you had BOM on. Don’t freak out! Just turn BOM back on (usually a button in your mesh head/body HUD) and you will go back into BOM mode.

Luckily, most skin makers are now making plenty of BOM ready skins, so you can find something you like. Some stores have even updated recent skins to add system layers that you can use with BOM, so check at your skin store to see if it’s been updated.

Hopefully, I’ve given you a good foundation with which to understand BOM moving forward, and to give it a try! In my other post, Keep Calm and Bakes on Mesh, I explain how to get started, good luck!


WTF IS HD???

Many newer heads and appliers these days are touting their “HD Makeup” but a lot of users have no idea what that means! And why would you if you’ve never really seen how it works, right? I thought I would try to explain that today so you can go forth and HD with knowledge! And science! OK not much science, but it sounded cool.

Anyway. In order to understand the difference between traditional makeup and HD makeup you need to understand what a UV is. I won’t bore you with confusing technical jargon, you just need to know that the UV determines how a mesh is textured. It tells you, for example, which area of the texture is for the eyes, the mouth, the ears, etc.

Here is a standard head UV template (courtesy of Robin Wood). As you can see, the lip and eye area are relatively small in comparison to the full size of the texture.

https://www.robinwood.com/Catalog/Technical/SL-Tuts/SLDownloads/UVMaps/SL-Avatar-Head-1024.jpg

Keep in mind, all textures have a maximize upload size set by Linden Labs. Currently the max is 1024×1024. The majority of textures uploaded for use in heads and bodies is the maximum allowed size. For this reason, HD is NOT relative to texture size, because everyone is already uploading at max texture size.

Here is my avatar using a lipstick I made with the standard UV

FearlessPreview.jpg

Not bad, right?

Now, here is the Lelutka Evolution HD lip UV. Compare it to the standard UV above. The mouth area takes up a significantly larger portion of the overall texture. So even though the texture’s size is the same as the standard UV above, the total area the HD lips use is much larger. That means waaaaay more pixels to add more detail with!

LeLUTKA.HD Lips.UV-EVOLUTION.png

Here is me in a recent HD lipstick I made with the Lelutka HD UV:

Teasersnapsot_001

What do you think, can you see the difference?

Now, you might be wondering “So why can’t I just have HD on my current head?” well UV’s don’t really work that way. You can’t swap a non HD lipstick area with an HD one. Actually, I take that back… you could but it won’t look right and it won’t be pretty and we can’t have that can we?

7a15af1934b19162b995293b8d4e2534

Not a good look

This is also why HD cannot be Bakes on Mesh or vice versa. BOM can only use the standard UVs, it cannot use the custom UVs used in HD appliers. Some makeup creators offer a makeup that includes options for HD and BOM, but the BOM makeup version is not the same as the HD version. It’s a lower quality version of the HD makeup, shrunk down to fit the standard UV. If you can’t use the HD makeup, that’s a good alternative, but quality wise the HD version will always look better than the BOM version.

That’s why you must have a head that supports HD makeup in order to use the HD appliers. Otherwise, the textures will not line up properly because the head cannot properly use custom UVs for HD makeup.

For Lelutka Evolution heads HD eyes and lips are built right in (and HD beards for the gents!). As of the 2.5 update released in November there are also HD brows!

Genus also include HD makeup in their heads.

For Catwa you can get an add on HD lip area with the newest version of the bento heads. If you don’t have it just snag a redelivery of your head. Catwa also released their line of “HD Pro” heads with more HD layers.

Hope that helps explain HD a little better, now go forth and HD yourself!

Keep Calm and Bakes On (Mesh)

snapshot_001.jpg

Yeah, you might look like a hot mess at first. It’s ok, that’s “normal” :-p

Take a deep breath, it’s ok. You will make it through Bakes on Mesh (BoM) with all your parts intact.

Now that BoM is here and the two big viewers (SL and Firestorm) support it many of the mesh groups have been flooded with questions about how to use it. There is a lot of confusion out there, so I thought I would put out a post to address some of the key questions and point to some helpful info. This will not be a complete tutorial on how to use every mesh body/head out there (that would be pretty near impossible) but it should at least get you started.

**UPDATE**

I have since created another page to explain some of the terms I use below, and how they relate to BOM, so if you don’t understand what exactly I mean when I things like “applier” and “system layer” try reading this first.

Thanks to Sтocĸιɴɢ (aeromia) for the BoM links she sent me in world to help get this blog started. ♥

So what the heck is Bakes on Mesh? For a full explanation and details check out the Knowledge Base page on BoM.

For the easy explanation, it basically lets you use the old system layers that were around before mesh, but on your mesh. It takes all those textures, combines them, and then applies them as one texture.

Some of the main benefits that users may see when using BoM are:

  • Things like tattoos will no longer alpha glitch with other transparent textures that are sitting over them.
  • Plenty of layers to pile on so you can have tattoos, makeup, freckles, etc. all on at the same time without worry over if there is a layer for them on your mesh.
  • You can use clothing specific alpha layers (for those stores that have supplied them) instead of relying on the alpha cuts in your body’s HUD.
  • You can use your old skins, tattoos, makeups, etc*

*Before you go breaking out the vintage skins and get your hopes up… just keep in mind older products were not made for mesh. The texture quality may not be great and may not align properly on your mesh. The hands and feet can look particularly off. Some creators have released tintable texture overlays to try to fix this, which can help, but a new skin made for your particular mesh head and body will have the best fit. See below for MP links.

And for the downfalls:

  • Many skin creators have not been releasing system layer skins, so many of the newer skins will still need to use appliers until skin makers ‘catch up’ (UPDATE: This isn’t so much an issue anymore, most major skin stores have been releasing new skins with system layers for a while now, so happy shapping!)
  • You can only use BoM with a system skin, so if you don’t have one you like you will  have to wait until you can get one.
  • BoM does not support materials at this time. It’s unclear if it ever will. You can still use materials on your body/head, they just won’t update according to whatever tattoo, clothing layer, etc. you are using with BOM.
  • You cannot change the opacity of anything you wear with BoM, like you currently can with applied makeups on heads.
  • Anyone not on the latest BoM viewer will see your avatar differently, and it wont be pretty. Most people have updated by now, however, so don’t let that discourage you!

You will still need appliers for certain items such as nails and lashes which have no coordinating system equivalent. Keep using your nail/lash appliers as usual.

So what do I need in order to use BoM?

  1. A BoM supported viewer such as the latest version of the Linden Labs viewer or Firestorm.
  2. A BoM supported head/body such as Lelutka, Catwa and Maitreya. Check if your meshes currently support BoM.
  3. Some meshes currently require a relay to work, such as Catwa and Maitreya (UPDATE: both have since updated to include BOM in the regular HUD). It will still work the same. (links to some below)
  4. A system skin. Preferably one a new one that is made for your head.

OK, I have all that but how do I use it?

Each mesh is a bit different, but the basic steps are as follows:

  1. Wear the system skin you want to use.
  2. Wear your BoM supported mesh head and body
  3. Click the “Bakes on Mesh” button in your body/head’s HUD or on the BoM relay.
  4. YOU MAY BECOME INVISIBLE OR BE COVERED IN COLORS LIKE RED AND YELLOW, THAT’S NORMAL. Don’t freak out.
  5. Remove your body/head alpha and wait a few seconds for the system to work. (Alpha layers are a system layer, and will transfer to your head/body if you’re still wearing them which will make you invisible or give you a texture error while in BoM mode. Don’t worry about hiding your system body/head, that will happen automatically when BoM loads up.)
  6. You should now see your system skin showing on your mesh.
  7. You can add other system layers like tattoos and makeup and they will appear over the skin.
  • If you are seeing a double head or body that means BOM is not enabled in that area. Check your HUD and try again. Do not put your alpha back on.
  • If you have everything working but the head is still gray, featureless, or looks outdated and not the skin you’re trying to wear be sure to check if your skin layer is for both head and body. Some skin creators put them out separately, so you may need to wear a skin or tattoo for your body AND a tattoo for your head.
  • If you are using Lelutka Evolution (has a black HUD) the head comes with BoM already enabled, and includes head skins and brows in tattoo layers. There are no skins/brows in the HUD. You will need to wear the included skin and brows, or another BoM skin. I do not suggest using Lelutka Evolution outside of BoM mode because the head does not have applier layers for hairbases, tattoos, blush, freckles, etc. You will need to use BOM blushes, brows, hairbases, freckles, etc. which can only be used while BoM is enabled. If you opt for an applier skin on an Evolution head you cannot use anything but skin, eye, lash, and HD makeup appliers.

OK I got it working… but I hate it. How do I get rid of it?

Easy! Find your applier skin you want to change back to and apply it. This will bring you back to using an applier skin and out of BOM. Make sure to add your alphas back on and you should be back to usual.

That’s the basics for now. Play around with your meshes and different options to get the hang of things. Want more info? Check out the links below. Hope this has helped you!

CAZIMI has been including system layers in our products for a while now. Look on the ad for it to say “system” or “BOM”. PLEASE always demo to be sure the BOM layer looks the way you want on your particular head. All heads have some variation in how the UV fits, which makes textures look slightly different depending what head you’re wearing, so always demo or you may find you purchase something that doesn’t look the way you expected.

I am updating the below links as I find more items so feel free to check back for new resources 🙂

Resource Links

BOM Fixes:

Relay HUDs:

Misc BoM Info:

Handy Videos: