If you were reading my previous blog post, Keep Calm and Bakes on Mesh, and found some of the terminology confusing, then my hope is to help give a better foundation for understanding what the heck I was talking about!
If you’re someone who came into SL after mesh was established, or you’ve been away for a while, or you just plain don’t remember how stuff used to work (It’s ok, I don’t like to think back on those dark days either) the switch to Bakes on Mesh can be reaaaaally confusing.
Even if you don’t plan to switch to BOM, the information I provide below can be really handy for helping your understand how mesh heads and bodies work so that you can be a few steps closer to a power user!
A little disclaimer
I am going to use the word “texture” a lot, and technically speaking I am referring to what we creators call the diffuse texture. For our purpose all you need to understand is that the texture I am talking about is the basic look of the item you’re changing on your mesh. It’s your skin, your tattoo, your makeup, lashes, it’s use on hair and furniture and everything to give it color, shading, and just to make it look real. I am not going to get into materials textures in this post, called normal and specular textures, which control the way your mesh interacts with light, so you don’t have to worry about that right now, just be aware they exist in case that comes up for you later.
Now, the first thing to understand about Bakes on Mesh is that you can change the textures on your mesh two ways. With an applier, or with a system layer. Each functions differently and has advantages and disadvantages. This is also one of the areas that tends to confuse people, so let’s talk about it.
What the heck is the difference between an “applier” and a “system layer”???
As I’ve said, when you have a mesh head/body with BOM capability there are two ways to change the textures on it. The first is the way we’re the most familiar with, because it was how we did it until BOM came along, which is to use an applier. An applier is a scripted object that attaches to your screen, called a HUD (Heads Up Display). When you press a button on the applier the script transfers a texture to your head/body. With appliers, the texture is transferred to a layer on your mesh, which I will explain shortly.

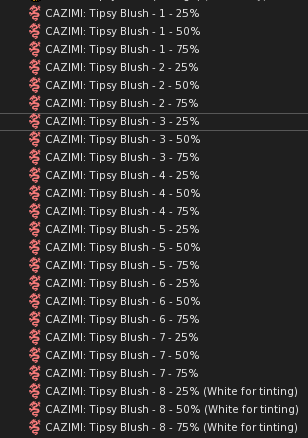
Above is an example of one of my blush appliers. When you wear it, the HUD attaches to the lower right corner of your screen. You click one of the pictures to apply that blush to the blush layer on your head.
Most mesh heads and bodies have various layers packed tightly together, all sitting just above your skin layer which serves as the base. This is called onion skinning. Makeup, brows, freckles, tattoos, etc. are all applied to one of the upper layers which makes them visually sit on top of your skin like they would in real life. The applier tells the mesh what texture to apply, and which layer to apply it to. Some appliers, like the newest version of Omega, have a rerouting function that lets you choose which layer to send it to. This can be handy in some cases, but for the most part the applier knows what to do and you don’t have to worry about it. Yay!
When you want to remove something you’ve applied to one of these layers you can either replace it with another applier, which replaces the texture on that layer with another, or clear/disable the layer via the HUD for your body/head. Each layer can (usually) only hold one applier, so there is a limit to how many things you can have on top of your skin, depending on the head/body you are using. Appliers like skin can only be replaced, because if you cleared the skin layer you would be see through! yikes!
Now, for many years this was how things were done with mesh. If you wanted to change your skin or makeup you had to go buy a scripted applier, apply it to a layer, and off you went. However, there are a few problems with doing it this way. For one, as I mentioned earlier, you’re limited in how much you can apply to your head, because there are only so many layers to put textures on. Another issue is the dreaded alpha glitch. SL handles textures with transparency (in other words, a texture that has some area that is see-through so that the skin below shows, like makeup and tattoos) in a certain way that is… not always uh… helpful. If you’ve ever stood in front of a window and noticed a weird clear halo around your hair, that’s an alpha glitch. Both your window and the wispy parts of your hair use transparency. The system doesn’t layer them together so you see one texture above the other, instead it cancels one of the textures out wherever the two overlap! Sometimes it creates a flickering effect, or does other weird stuff, too.
The dreaded alpha glitch! The system is cancelling out the texture of my window in all the places where my mesh hair over lap it.
Now technically… it’s not really a glitch because it’s functioning the way Linden Labs intended but… let’s not get into that. What you need to know is that this causes issues in things like tattoos and other appliers. Sometimes you get a glitch on an applier layer overlapping with another transparent texture.

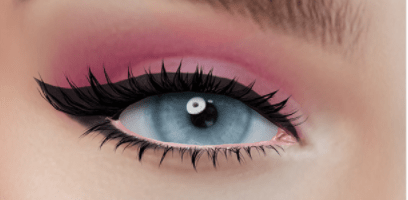
This is my eyeliner conflicting with my hair, both have transparency. The system is cancelling my eyeliner wherever my hair texture overlaps with it.
It used to be you just lived with the glitches, or found a way around it, because appliesr were the only way the do things, and appliers had to use transparency to look right. Now along comes Bakes on Mesh, aka BOM. Suddenly all the rules have changed! GAH!
As I explain in my first post about BOM, it allows you to use system layers on your mesh head/body. But what the heck does that even mean?
A system layer is found in your inventory, like an applier, but a system layer is not a scripted HUD. It doesn’t attach to your screen or have buttons. You wear it, or take it off, and that’s all there is to it. In “the old days” before mesh heads and bodies that was how you wore tattoos, clothing, makeup and such. There are a few different kinds of system layers, your skin layer, tattoo layers, clothing layers, etc. These basically all helped determine which item was on the bottom and which was on the top or in between. Your skin was always on the bottom, clothes were always on the top, etc. When you wore the system layer the game would take all your worn layers and bake them together (just a fancy way of saying they were combined into one texture), then put that texture on your avatar’s skin layer (although at the time there were no other layers, so no one thought of it like that, it was just your avatar). There was no onion skinning. The advantage to this is that you can layer a lot more stuff on your avatar because you’re not limited to mesh onion skin layers, and there was no alpha glitching because transparency of the upper layers was removed when everything was baked together.
System layers as seen in Firestorm. These are tattoo system layers.
Here is where Bakes on Mesh comes in. It allows you to combine the functionality of both systems. BOM will take all your system layers and bake them, then set that texture on the skin layer (bottom most layer) of your mesh. You no longer have alpha glitching, and you can use a LOT of system layers compared to what you could layer with an applier, so long as you are using system layers with BOM enabled. It’s particularly handy if you like to wear tattoos, which easily glitch when applied, but are no problem in Bakes on Mesh. It’s also great for layering lots of makeups for different looks!
Depending on what mesh you’re using, you can use a combination of Bakes on Mesh with appliers on top, if needed. Any HD (High Definition) appliers are not BOM compatible (they use a different texture layout so they just don’t look right unless applied. I explain HD more in this post) so you have to apply them, but you can layer other items below them with BOM. I like to do this with my HD eyeliners, using a BOM eyeshadow below it to change out the color and look of the makeup.
HD eyeliner with t pink BOM eyeshadow below it
Another thing about BOM that tends to confuse people is alpha layers. Before BOM, you had to wear an alpha layer to hide your system body/head (that body and head you had when you first logged into SL) so that you wouldn’t appear to be wearing two bodies. With BOM, your system body/head with be automatically hidden for you, so you do not need to wear an alpha layer. If you do, it will appear as though your head/body has disappeared, because an alpha layer is a system layer, and ANY system layer you’re wearing gets included in the baking process. Alphas were made to hide your body, and they will hide your mesh, too! Now in some cases you can use alphas with BOM to your advantage, such as if there is one included with a mesh wearable like clothing. These alphas may be designed to perfectly hide your mesh to keep it peaking through your clothes. Otherwise, you don’t really need to worry about alphas anymore if you’ve gone full BOM. Any area of your body that is NOT BOM, like your eyes for example, still needs an alpha.
Lastly, in order to use BOM you MUST have a system skin, NOT an applier skin. When the system bakes your system layers it needs a base to bake everything to, and that base is yours skin. Otherwise, everywhere your skin normally shows would actually be see-through, and that’s probably not the look you want. If you attempt to use a skin applier while in BOM, it will automatically disable BOM and you will see your system head/body again and lose anything you were seeing on your skin layer while you had BOM on. Don’t freak out! Just turn BOM back on (usually a button in your mesh head/body HUD) and you will go back into BOM mode.
Luckily, most skin makers are now making plenty of BOM ready skins, so you can find something you like. Some stores have even updated recent skins to add system layers that you can use with BOM, so check at your skin store to see if it’s been updated.
Hopefully, I’ve given you a good foundation with which to understand BOM moving forward, and to give it a try! In my other post, Keep Calm and Bakes on Mesh, I explain how to get started, good luck!

One thought on “Back that BOM Up”
Comments are closed.