WTF IS HD???

Many newer heads and appliers these days are touting their “HD Makeup” but a lot of users have no idea what that means! And why would you if you’ve never really seen how it works, right? I thought I would try to explain that today so you can go forth and HD with knowledge! And science! OK not much science, but it sounded cool.

Anyway. In order to understand the difference between traditional makeup and HD makeup you need to understand what a UV is. I won’t bore you with confusing technical jargon, you just need to know that the UV determines how a mesh is textured. It tells you, for example, which area of the texture is for the eyes, the mouth, the ears, etc.

Here is a standard head UV template (courtesy of Robin Wood). As you can see, the lip and eye area are relatively small in comparison to the full size of the texture.

https://www.robinwood.com/Catalog/Technical/SL-Tuts/SLDownloads/UVMaps/SL-Avatar-Head-1024.jpg

Keep in mind, all textures have a maximize upload size set by Linden Labs. Currently the max is 1024×1024. The majority of textures uploaded for use in heads and bodies is the maximum allowed size. For this reason, HD is NOT relative to texture size, because everyone is already uploading at max texture size.

Here is my avatar using a lipstick I made with the standard UV

FearlessPreview.jpg

Not bad, right?

Now, here is the Lelutka Evolution HD lip UV. Compare it to the standard UV above. The mouth area takes up a significantly larger portion of the overall texture. So even though the texture’s size is the same as the standard UV above, the total area the HD lips use is much larger. That means waaaaay more pixels to add more detail with!

LeLUTKA.HD Lips.UV-EVOLUTION.png

Here is me in a recent HD lipstick I made with the Lelutka HD UV:

Teasersnapsot_001

What do you think, can you see the difference?

Now, you might be wondering “So why can’t I just have HD on my current head?” well UV’s don’t really work that way. You can’t swap a non HD lipstick area with an HD one. Actually, I take that back… you could but it won’t look right and it won’t be pretty and we can’t have that can we?

7a15af1934b19162b995293b8d4e2534

Not a good look

This is also why HD cannot be Bakes on Mesh or vice versa. BOM can only use the standard UVs, it cannot use the custom UVs used in HD appliers. Some makeup creators offer a makeup that includes options for HD and BOM, but the BOM makeup version is not the same as the HD version. It’s a lower quality version of the HD makeup, shrunk down to fit the standard UV. If you can’t use the HD makeup, that’s a good alternative, but quality wise the HD version will always look better than the BOM version.

That’s why you must have a head that supports HD makeup in order to use the HD appliers. Otherwise, the textures will not line up properly because the head cannot properly use custom UVs for HD makeup.

For Lelutka Evolution heads HD eyes and lips are built right in (and HD beards for the gents!). As of the 2.5 update released in November there are also HD brows!

Genus also include HD makeup in their heads.

For Catwa you can get an add on HD lip area with the newest version of the bento heads. If you don’t have it just snag a redelivery of your head. Catwa also released their line of “HD Pro” heads with more HD layers.

Hope that helps explain HD a little better, now go forth and HD yourself!

Designer Chatter: Creating Beautiful Photos

Dreamy_Ad_4x3_Notext.jpg

Every now and then I post about various topics from the perspective of a designer in my “Designer Chatter” series. If you would like to submit a question or topic for a future post feel free to use my contact page. Are you a designer and want to weigh in on the topic? Link back here so others can join in!

Today I was making the above photo and decided my next topic should be on how to make pretty Second Life photos. Who doesn’t like that?

Hooo boy this is a big topic! There are so many great resources for how to setup your shot, lighting, and editing your final photo so I will be referring you to tons of links! I will try to cover the basics here, because it’s simply too large a topic to cover in one blog post, but this should at least get you started.

Keep in mind there are many different ways to do this, it really all comes down to what works for you. So try different things and learn as much as you can.

Disclaimer: I use Firestorm viewer and Photoshop, so my resources will mostly refer to these tools. I am also going to assume that you have already chosen what to wear and what will be in your background.

Setting Up Your Shot

The absolute number one first thing you must know is how to use your camera. The biggest mistake I see photographers make is the ‘fish eye’ effect in their close ups.

FishEye1_001 FishEye2_001
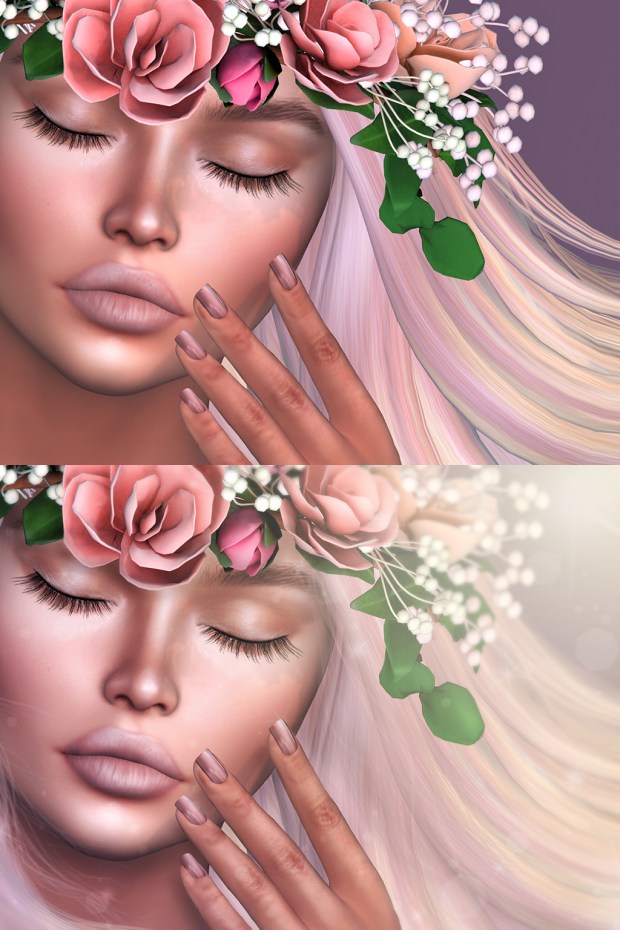
The left photo uses standard camera zoom which causes distortion. Notice how the face looks elongated and the lips, nose and eyes look big? The Right photo uses CTRL + 0 to zoom in and has no lens distortion.

From zoomed out hold ATL and click on what you want your camera to focus on. Hit CTRL + 0 to zoom in till you’re happy with it. Use CTRL + 8 to zoom out and CTRL + 9 to exit back to normal camera control.

Lighting

Lighting is a huge topic, so I will be referring to several videos on this subject. They key points to understand are that lighting is what gives your picture depth and realism. It will add or remove shadows, highlight, shine, color and texture. The two main ways of manipulating lighting (in Second Life) is by changing your Windlights which changes the lighting for the entire world around you, or by using light boxes/projectors similar to how a real photographer would place real lights.

Editing in Photoshop

So you’ve got your perfect raw shot, now what? Here is the before and after for the photo I did today. As you can see there is a lot of work you can do to enhance your photo and add various effects.

DreamyLips_Ad_4x3_BeforeAfter.jpg

One of first thing I like to do is to work on enhancing the shadows and highlights of the photo. I use a little trick I picked up in a non Second Life tutorial a long time ago (unfortunately I cannot recall the video to link to, sorry). I add a new layer of pure medium gray and set it to overlay. I then use the dodge and burn tools on this layer to work in shadows and highlights. Next I add a clear layer and paint on some soft shadows with black and lower the opacity till I get the look I want. This allows me to edit the look without making changes to the raw photo. You can experiment with this to see if it works well for you.

These tutorials use similar techniques for shadows and highlights:

Or you may want to add lense flair, sparkles, rian or other effects. These tutorials are really handy:


Other Helpful Tutorials & YouTubers

Useful SL Tools

  • Animare: Allows you to adjust your avatar’s pose
  • Lelutka Axis HUD: Gives you fine detailed control over your mesh head’s expression and position. Works on other heads besides Leltuka. Try the demo if you’re not sure.
  • Broken Princess 3 Way Directional Lighting Effects: For just 1L this is a cheap way to try some projection lights out!
  • Cynefin Projection Lighting Kit: I have not used this one yet but it’s a lighting projector kit for those who are new to lighting or don’t want to bother with the hassle of making them from scratch.
  • FOXCITY. Skin FX – Volume I: Attachable lighting for easy lighting tweaks.
  • FOXCITY. Skin FX – Volume II: Attachable lighting for easy lighting tweaks.I haven’t used this one but I use Volume I a lot.
  • FOXCITY. Spooky Projectors: Gives a spide, bat or web lighting effect.
  • LUMIPro: Pricey, but some people swear by it. This is an advanced lighting HUD. You can find more info here.
  • Fate Hand Poser: This is so crucial for me! I use this in almost every photo for my nail ads to fine tweek the fingers to where I need them.
  • L’Etre Natural Mesh Eyelids: On most mesh heads your closed eyelids look really weird. These mesh eyelids fit over your closed eyes to give a more realistic look. I used them in today’s demo photo above.

Handy Photoshop Resources

There are SO MANY great brushes, overlays, styles, gradients, etc. I could never list them all. Just be sure you are using resources with the correct licensing. So if you sell your photos or use them for ads be sure your resource is licensed for commercial work. If you just make photos for personal use then most resources should be right for you.

  • Photoshop: There is a monthly cost, depending on the plan you use, but PS is the best program for graphics editing.
  • GIMP: Can’t afford PS? This is the next best thing. Harder to find resources for and not as powerful, but it can do a lot of the same basics as PS.
  • Brusheeezy: Brushes, Photoshop Patterns, Textures, PSDs, Actions, Shapes, Styles, & Gradients
  • Obsidian Dawn: Mostly brushes but has some other resources and tutorials
  • Brushes by Stephannie Valentin: Love her hair brushes, I use them all the time!

Hopefully this helps get your started on your journey to lovely photos. Good luck!

Designer Chatter: How I choose my events

Snapshot_010.png

I thought it would be fun to now and then post about various topics from the perspective of a designer. So here we are! The first post in my “Designer Chatter” series. I’ll try not to ramble in these, but it may happen from time to time, hence the use of ‘chatter’ in the name. If  you would like to submit a question or topic for a future post feel free to use my contact page. Are you a designer and want to weigh in on the topic? Link back here so others can join in!

Today’s topic is how I choose my events. I get anywhere from 5 – 20 different event invitations a week. Obviously I cannot participate in all of them, so how do I decide which ones to try?

Please keep in mind this is all from my personal perspective, so I hope no one will feel I am pushing my process on them. For you event organizers I realize running events must be extremely time consuming and difficult. There is a reason I haven’t tried to run one myself! I certainly don’t expect perfection, but perhaps this post can help you understand what a designer might see when you send them your invitation.

Most events will send me a notecard with information. This is pretty standard, and works well. What is in that notecard, however, vastly differs and is crucial to making a first impression. I always look for full event details including:

  • Setup dates and open/close dates: I work full time in RL plus running a busy store in SL. I have a very full schedule to stick to. Knowing all the deadlines up front is crucial in determining if I can fit an event in.
  • Any fees or percentage cuts: The higher the fees the better the event should be. For those that have not done events it’s not unusual to spend $L2,000-$L3,000 in rent per round at a well organized event. Key spots at the entry point, usually called “sponsors” are even higher. In order to cover the direct costs of being in that event (rental, upload fees, any resources purchased for the item made, etc.) the designer has to make back that rental fee before they make profit. Keep in mind profit from an event still goes towards the regular cost of running a store (land rent, advertising, uploads, purchasing builds and furniture, etc.) Some events do a percentage of sales going to the event. This is a nice set up because it ensures that the event organizer will have an incentive for designers to have good sales.
  • Prim allotment / booth size: Helps me figure out what kind of setup I can have. Basically how pretty can I make my booth?
  • General rules: What are the requirements my store must meet in order to participate? Do I even qualify to be in this event?
  • Product rules: Is an exclusive item required? Sale item? Price restrictions? Custom mesh only? Themed items? Most events want a new, exclusive item to bring in fresh shoppers, but this makes it much harder to squeeze the event into my schedule because I must also account for the time it takes to create a new product. If it’s a discount event I can use older releases but I need to plan around what items I can offer that will represent me well.
  • Landmark(s) to the event, payment area, blogger area, etc: At the very least there should be a landmark to the location of the event if at all possible. I like to check a location out and it gives your event more credibility. Remember, you’re a random person asking a stranger for money. Scams are out there, you don’t want to look like a scammer.
  • Advertising info: Where and how will the event be listed and advertised? This just proves if it will be likely to have enough customers to make it worth the designer’s fee and time.
  • Who is sponsoring? If this event is organized/sponsored by any big name brands that is good to know too. It helps show that it is backed by some established SL businesses.
  • Who else is in the event? I like to check that I am in an event with similar designers to myself. This helps to ensure I am in the right type of event for my target audience. For example I am unlikely to sign up for an event with designers who make mostly children’s items because I simply don’t make that type of item.
  • Where do I get more information or apply? Is there a Flickr to show off photos by your bloggers? A website? Facebook?
  • Key contacts: Who do I contact if I have questions? Attach their contact card, don’t make me go searching for someone.

Remember the easier it is for me to get information and be impressed by an event the more likely I am to be interested. I can’t count how many times I was sent an event NC with no information about where it was, where to apply, when the set up will be, who is in it, etc. If I have to hunt down information about the event well… I probably just won’t bother. Have someone proof read your notecard, too. A typo is one thing, but an invitation riddled with spelling and grammatical errors is not very impressive. The invitation and information in that notecard are the event’s first impression. If the impression is ‘not very well organized’ I am likely to pass on it.

Another thing to note is requiring freebies. Now I like to put out some freebies now and then, but if your event has to have vendors making a free gift every round to keep traffic up that doesn’t reflect well. Some events this works for, but generally speaking I am looking for events that can hold their own without new gifts every round. Additionally, attracting large crowds of freebie hunters makes me question if the shoppers at your event have disposable income to spend at my booth. If there are a bunch of freebies will they even feel the need to make purchases? Lastly on this particular topic, please do not require group gifts made by your designers and then charge a fee to enter the group to get the gifts. This is essentially making money off of a designer’s freebies. If you insist on doing this at least be up front about it with your designers and state it in the information notecard.

Now that we’ve covered the notecard, a few other things to keep in mind. Aesthetics matter. I do look at the event setup, the logo, the website, the owner’s profile, etc. I am a designer, I look for good design. It’s in my nature! If you’re not great at logo design then hire someone who is. If you’re not a great builder, get one or purchase a nice pre made build. Your website doesn’t need to be flashy, a simple and well organized WordPress page is fine, just make sure that it is up to date with correct information. Nothing turns me off of an event faster than going to the website and the event information is from a round that took place months ago with no mention of recent rounds.

When it comes to how I am contacted, I look for friendly and professional. I have myself enjoyed many years of role play in SL, however, I do not discuss business with someone who speaks in character as a child or a Gorean slave. I take my store seriously. It is a full time job. I have fun with CAZIMI and I love what I do, but I am not putting the success of my business in the hands of a fictional character.

Don’t spam me with invitations. I know sometimes people can send an invitation again without realizing they already did, but don’t make a habit of it. Don’t hire multiple staff to blindly send out invitations to designers. When we get spammed with the same invitation every week (or worse, every few days) it’s not only annoying but it makes the event appear desperate. You’re more likely to get blocked than get me to sign up.

Lastly, please don’t take it personal when a designer declines to participate in your event. There are a million reasons why we can’t be in an event. Maybe we don’t have space for another, the dates don’t work with our schedule, our products are not a good fit, we can’t afford the rental, etc. Just keep improving your game and designers will be more likely to apply.

Thanks for listening!